There is nothing quite like the sound of a fork crunching through perfectly golden-brown chicken. It’s that sharp, satisfying snap that tells you dinner is going to be a win before you even take the first bite. I remember the first time I made these Crispy Parmesan Chicken Tenders for my family. The house smelled like toasted breadcrumbs and savory herbs, and my kids actually looked up from their phones to ask for seconds. Honestly, it was one of those rare moments where homemade comfort food actually beat the drive-thru.
Let’s face it, we’ve all been there. You’re tired, the kids are hungry, and the last thing you want is to spend an hour chopping vegetables or monitoring a simmering pot. That’s why this recipe is my go-to for weeknight miracles. It takes just five simple steps to get from raw chicken to a plate of crispy, juicy goodness. You know how it is when you want something that feels indulgent but doesn’t leave you feeling sluggish an hour later? This hits that sweet spot perfectly.
I’ve tested this method over a dozen times, tweaking the breadcrumb blend and the frying temperature to get the texture just right. It’s not just about being crispy; it’s about that tender meat inside holding up to the crunch. Whether you are feeding a picky eater or just craving some serious comfort food, these tenders deliver every single time. They are versatile enough for a kid’s party, a quick lunch, or a cozy date night at home. Plus, they freeze beautifully, which is a lifesaver for busy mornings.
What makes this specific version special is the addition of real parmesan cheese right into the crust. It adds a nutty, salty depth that plain breadcrumbs just can’t match. You get that restaurant-quality finish without the complicated prep work. If you are looking for a reliable, flavorful, and fast chicken recipe that everyone in the family will actually ask for, you have found it. Let’s get cooking and make some magic in the kitchen.
Why You’ll Love This Recipe
I have tried dozens of chicken tender recipes over the years, from flour-dusted versions to heavy batter coatings. This Crispy Parmesan Chicken Tenders recipe stands out because it strikes the perfect balance between ease and flavor. It isn’t just another copycat attempt; it is a refined version that solves the common problems of soggy coatings or dry chicken. Here is why this recipe has earned a permanent spot in my weekly rotation.
- Quick & Easy: You can have dinner on the table in under 20 minutes. The prep is minimal, and the cooking time is short. It is perfect for those chaotic weeknights when you need something fast but don’t want to compromise on quality.
- Simple Ingredients: You likely already have everything you need in your pantry and fridge. No need for a special trip to the store for hard-to-find items. Just chicken, cheese, breadcrumbs, and basic spices.
- Perfect for Meal Prep: These tenders hold up well in the fridge and reheat nicely. They are great for packing lunches or having a quick protein source ready for the next day.
- Crowd-Pleaser: Kids love the crunch, and adults appreciate the flavor. They are versatile enough to serve with dipping sauces or alongside roasted veggies.
- Unbelievably Delicious: The parmesan creates a savory crust that is addictive. The texture is light yet crunchy, and the chicken stays moist inside.
What really makes this recipe different is the double-dipping technique I use. It ensures the coating sticks properly without being too thick. I also use a mix of panko and regular breadcrumbs for varied texture. This isn’t just a quick fix; it is a carefully constructed recipe that delivers consistent results. It’s the kind of dish that makes you close your eyes after the first bite because it just tastes right. It brings that soul-soothing satisfaction of comfort food but with a fresher, lighter profile. It’s perfect for impressing guests without the stress of a complicated menu.
What Ingredients You Will Need
This recipe relies on high-quality, accessible ingredients to create a bold flavor profile. The key is keeping the seasoning simple so the natural taste of the chicken and cheese shines through. I prefer using fresh parmesan because pre-grated cheese often contains anti-caking agents that prevent it from melting and browning properly. Here is what you need to gather before you start.
- Chicken Breasts: Use boneless, skinless chicken breasts. Look for fresh, plump breasts that are uniform in size. I recommend buying from a local butcher if possible for better texture. Cut them into strips about 1 inch thick.
- Parmesan Cheese: Freshly grated parmesan is essential. I use a block of parmesan and grate it myself. It melts better and has a sharper flavor than the stuff in the green shaker.
- Panko Breadcrumbs: These Japanese-style breadcrumbs are crucial for that extra crunch. They absorb less oil and stay crispier than regular breadcrumbs. Look for a brand with large, flaky crumbs.
- All-Purpose Flour: This helps the egg wash stick to the chicken. Use standard white flour for a neutral flavor base.
- Eggs: Large eggs beaten with a little water or milk. The fat in the egg helps the coating adhere and adds richness to the crust.
- Italian Seasoning: A blend of dried herbs like oregano, basil, and thyme. It adds an aromatic depth that pairs perfectly with parmesan.
- Garlic Powder: Adds a savory punch without the risk of burning fresh garlic. It’s a pantry staple that boosts flavor significantly.
- Salt and Black Pepper: Essential for seasoning the chicken and the coating. Use kosher salt for better control over seasoning levels.
- Olive Oil: For frying, I use a high-smoke point oil like olive oil or avocado oil. It adds a subtle fruitiness that complements the cheese.
If you want to keep it dairy-free, you can swap the parmesan for nutritional yeast, though the flavor will be different. For a gluten-free option, use gluten-free panko or almond flour. I find that using a mix of panko and fine breadcrumbs gives the best texture, but pure panko works well too. The key is to keep the ingredients fresh and the measurements accurate for the best results.
What Equipment Do I Need?
You don’t need any fancy gadgets to make these tenders. A few basic tools will get the job done efficiently. I use a large skillet, preferably cast iron or stainless steel, for even heating. A wire rack is helpful if you want to keep the tenders crispy while you fry the next batch. Paper towels are essential for draining excess oil. Having everything prepped and within reach makes the cooking process smooth and stress-free.
How to Make Crispy Parmesan Chicken Tenders
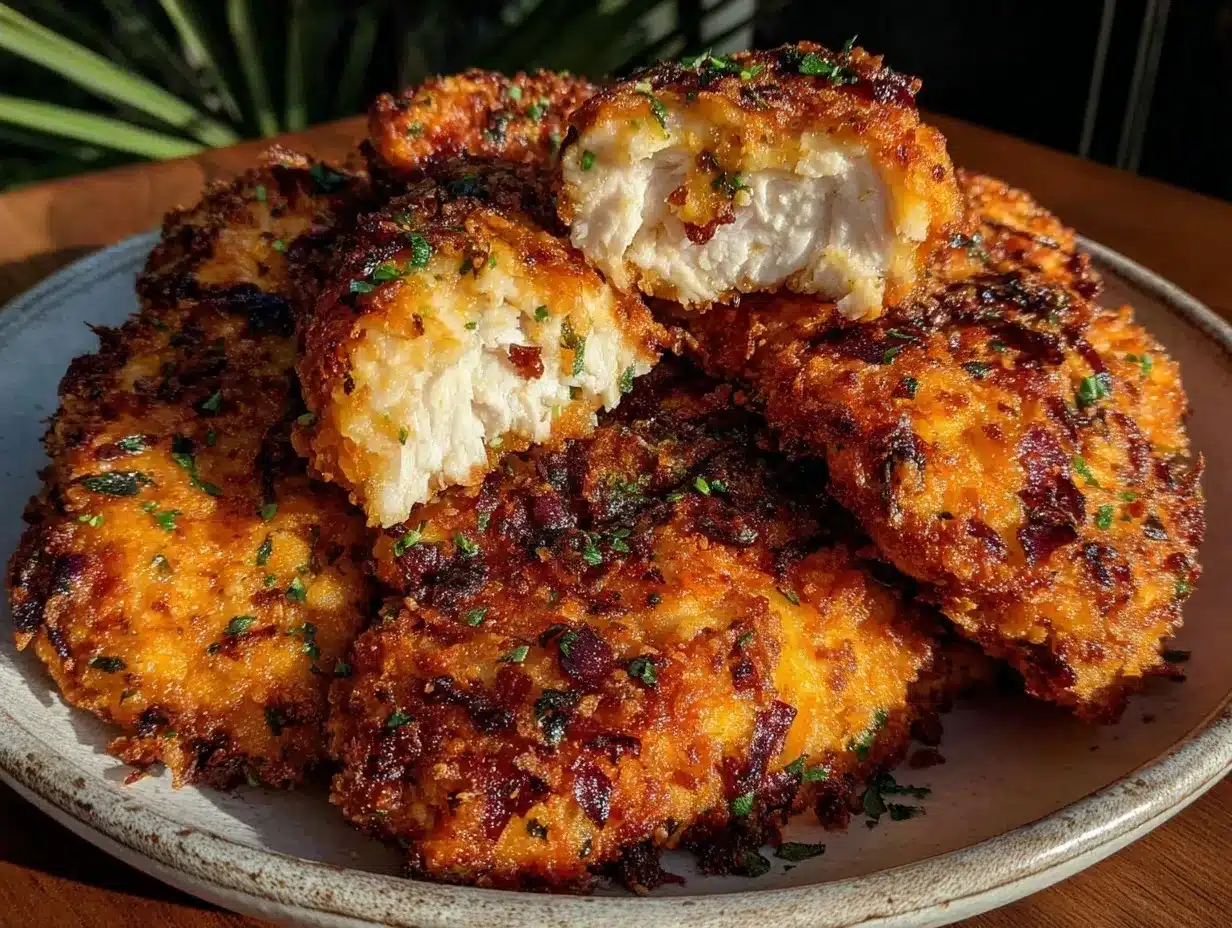
Getting these tenders just right requires a bit of technique, but the steps are straightforward. Follow this guide to ensure your chicken comes out golden, crunchy, and juicy every time. The process involves coating, frying, and resting, each step playing a vital role in the final texture.
- Prepare the Chicken: Start by patting the chicken strips dry with paper towels. Moisture is the enemy of crispiness, so this step is crucial. Cut the chicken into uniform strips, about 1 inch wide. Season them lightly with salt and pepper. This ensures the meat itself is flavorful, not just the crust.
- Set Up the Breading Station: You will need three shallow bowls. In the first bowl, place the all-purpose flour. In the second bowl, beat the eggs with a tablespoon of water. In the third bowl, mix the panko breadcrumbs, grated parmesan cheese, Italian seasoning, garlic powder, salt, and pepper. Whisk the dry ingredients together well to distribute the seasoning evenly.
- Coat the Chicken: Dredge each chicken strip in the flour, shaking off any excess. Next, dip it into the egg wash, making sure it is fully coated. Finally, press it firmly into the breadcrumb mixture. Make sure to press the crumbs into the chicken so they stick. For extra crunch, you can double-dip by repeating the egg and breadcrumb steps.
- Heat the Oil: Pour about 1/4 inch of olive oil into a large skillet. Heat it over medium-high heat until it reaches 350°F (175°C). If you don’t have a thermometer, test it by dropping a breadcrumb into the oil. If it sizzles immediately and turns golden in 60 seconds, the oil is ready.
- Fry the Tenders: Carefully place the coated chicken strips into the hot oil. Do not overcrowd the pan; fry in batches if necessary. Cook for about 3-4 minutes on each side, or until the coating is deep golden brown and the chicken is cooked through. The internal temperature should reach 165°F (74°C).
- Drain and Rest: Remove the tenders from the oil and place them on a wire rack lined with paper towels. Let them rest for a few minutes before serving. This allows the juices to redistribute and the crust to set, keeping it extra crispy.
Pay attention to the color of the crust. If it browns too quickly, lower the heat. You want a golden exterior with a fully cooked interior. If the chicken is too thick, you might need to pound it slightly to ensure even cooking. Trust your senses here; the smell of frying chicken and the sound of the sizzle are your best guides.
Cooking Tips & Techniques
There are a few tricks I’ve learned along the way that make a huge difference in the final result. First, always dry your chicken thoroughly. Any surface moisture will steam the coating instead of frying it. Second, keep the oil temperature consistent. If the oil is too cool, the tenders will absorb too much fat and become greasy. If it’s too hot, the outside will burn before the inside is done.
I often make the mistake of crowding the pan, which drops the oil temperature. Resist the urge to fit too many tenders in at once. Cook in batches for the best texture. Another tip is to let the breaded tenders sit for 5 minutes before frying. This helps the coating adhere better and prevents it from falling off in the oil. Also, use a candy or deep-fry thermometer to monitor the oil. It takes the guesswork out of the process.
If you prefer baking, you can bake the tenders at 400°F (200°C) for 15-20 minutes, flipping halfway. However, frying gives that authentic crunch that baking struggles to replicate. For baking, spray the tops with cooking oil to help them brown. Remember, consistency is key. Practice makes perfect, and soon you’ll be able to judge the oil temperature by eye alone.
Variations & Adaptations
This recipe is quite versatile, and you can tweak it to suit your preferences or dietary needs. For a spicy kick, add red pepper flakes or cayenne pepper to the breadcrumb mixture. If you want a healthier option, try air-frying the tenders at 375°F (190°C) for 10-12 minutes, flipping halfway. They won’t be quite as crunchy as fried, but they are much lighter.
You can also switch up the cheese. Pecorino Romano adds a sharper, saltier flavor, while cheddar creates a gooier, more indulgent crust. For a gluten-free version, use almond flour or gluten-free panko. I once tried using crushed cornflakes for the coating, and it added a unique sweetness and crunch that was surprisingly good. Feel free to experiment with different herbs, like adding fresh parsley or basil to the mix.
If you are cooking for kids, you can omit the garlic powder and Italian seasoning for a milder flavor. You can also dip them in ketchup or ranch dressing for a classic combo. The base recipe is a solid foundation that allows for many creative twists. Don’t be afraid to adjust the seasonings to match your taste buds.
Serving & Storage Suggestions
These tenders are best served immediately while they are hot and crispy. Pair them with a side of roasted vegetables, a fresh green salad, or crispy fries. A dollop of tartar sauce, ranch dressing, or marinara sauce adds a nice contrast to the savory crust. For a complete meal, serve them with mashed potatoes or garlic bread.
Leftovers can be stored in an airtight container in the refrigerator for up to 3 days. To reheat, use an oven or air fryer at 375°F (190°C) for 5-7 minutes. This helps restore the crispiness that the microwave might soften. Avoid microwaving if you want to maintain the texture. They also freeze well. Place the cooked tenders on a baking sheet and freeze them solid, then transfer to a freezer bag. Reheat from frozen in the oven for best results.
The flavors actually meld nicely after a day in the fridge, making them great for meal prep. You can chop them up and add them to salads for extra protein. The parmesan crust holds up surprisingly well to reheating, especially if you use an air fryer. Just make sure to store them properly to prevent them from drying out.
Nutritional Information & Benefits
Chicken breast is a lean source of protein, making this recipe a good choice for those watching their calorie intake. Parmesan cheese adds calcium and flavor without needing large quantities. The panko breadcrumbs provide carbohydrates for energy. Overall, this dish is balanced and satisfying. A serving contains approximately 350-400 calories, depending on the oil used and the size of the chicken strips.
This recipe is naturally gluten-free if you use gluten-free breadcrumbs, and it can be made dairy-free by omitting the cheese. It is high in protein and relatively low in sugar. I enjoy this as part of a balanced diet because it provides sustained energy without the crash. The use of olive oil adds healthy fats, which are essential for nutrient absorption. It’s a guilt-free comfort food that fits into most lifestyle preferences.
Conclusion
Making Crispy Parmesan Chicken Tenders at home is easier than you think, and the results are worth the effort. You get that restaurant-quality crunch and flavor without the hassle of going out. It’s a recipe that brings joy to the table and satisfaction to the palate. I hope you try this and find it to be a new family favorite.
Feel free to customize the seasonings and serving ideas to match your tastes. Whether you serve them with dipping sauces or alongside a simple salad, they are sure to be a hit. Don’t forget to share your creations with me in the comments. I love hearing about your kitchen adventures and seeing your variations. Happy cooking, and enjoy every crunchy bite!
Frequently Asked Questions
Can I bake these instead of frying?
Yes, you can bake them at 400°F (200°C) for 15-20 minutes, flipping halfway. Spray with oil for better browning. They won’t be as crispy as fried, but still delicious.
How do I keep the coating from falling off?
Pat the chicken dry, dredge in flour, dip in egg, and press firmly into breadcrumbs. Let them rest for 5 minutes before cooking to help the coating set.
Can I use frozen chicken breasts?
It’s best to use fresh chicken for even cooking. If using frozen, thaw completely and pat very dry. Frozen chicken can release too much moisture.
What dipping sauces go best with these tenders?
Tartar sauce, ranch dressing, honey mustard, and marinara sauce are all excellent choices. Try different ones to find your favorite.
How long do leftovers last?
Store in an airtight container in the fridge for up to 3 days. Reheat in an oven or air fryer to maintain crispiness.
Pin This Recipe!


Crispy Parmesan Chicken Tenders: 5-Step Easy Recipe
- Total Time: 20 minutes
- Yield: 4 servings
Description
These crispy parmesan chicken tenders are a quick, weeknight-friendly meal that delivers restaurant-quality crunch and flavor. With a simple breading station and double-dip technique, you get juicy chicken coated in a savory, golden crust.
Ingredients
- Boneless, skinless chicken breasts (cut into 1-inch strips)
- Freshly grated parmesan cheese
- Panko breadcrumbs
- All-purpose flour
- Large eggs (beaten with water or milk)
- Italian seasoning
- Garlic powder
- Kosher salt
- Black pepper
- Olive oil (for frying)
Instructions
- Pat chicken strips dry with paper towels and season lightly with salt and pepper.
- Set up a breading station with three shallow bowls: one with flour, one with beaten eggs, and one with a mix of panko, parmesan, Italian seasoning, garlic powder, salt, and pepper.
- Dredge each chicken strip in flour, dip in egg wash, then press firmly into the breadcrumb mixture. For extra crunch, double-dip by repeating the egg and breadcrumb steps.
- Heat 1/4 inch of olive oil in a large skillet over medium-high heat until it reaches 350°F (175°C).
- Fry the tenders in batches to avoid overcrowding, cooking for 3-4 minutes on each side until deep golden brown and the internal temperature reaches 165°F (74°C).
- Remove tenders from oil and place on a wire rack lined with paper towels to drain and rest for a few minutes before serving.
Notes
Ensure chicken is patted completely dry to maximize crispiness. Keep oil temperature consistent at 350°F to prevent greasy or burnt results. Let breaded tenders rest for 5 minutes before frying to help the coating adhere. For baking, cook at 400°F for 15-20 minutes, flipping halfway and spraying with oil.
- Prep Time: 10 minutes
- Cook Time: 10 minutes
- Category: Main Course
- Cuisine: American
Nutrition
- Serving Size: 4 tenders per servin
- Calories: 375
- Sugar: 1
- Sodium: 450
- Fat: 18
- Saturated Fat: 5
- Carbohydrates: 25
- Fiber: 1
- Protein: 28
Keywords: chicken tenders, parmesan chicken, crispy chicken, quick dinner, weeknight meals, comfort food, fried chicken, panko chicken