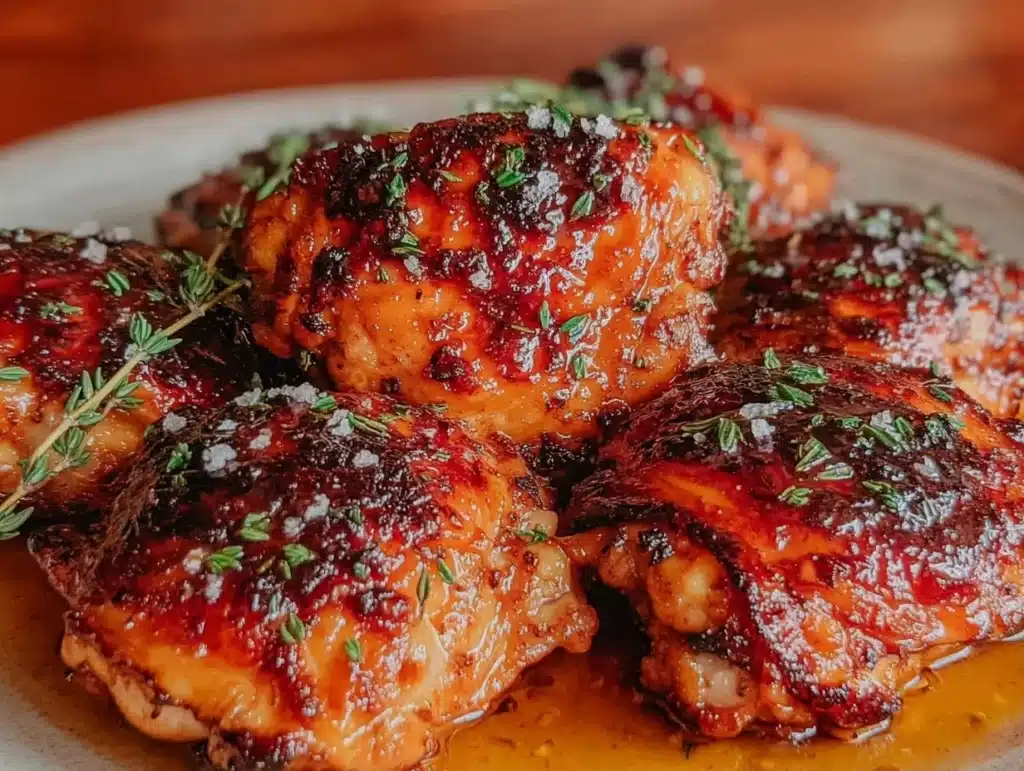
There is a specific kind of magic that happens when the oven timer dings and the smell of roasted garlic and thyme fills your kitchen. It’s the kind of smell that makes you forget you’re tired, hungry, and probably still in your work clothes. I remember the first time I really nailed this recipe, it was a Tuesday in November, rain lashing against the windows, and I needed something that felt like a hug on a plate. I had tried so many methods—pan frying, slow cooking, even grilling—but nothing quite matched the comfort of thick, juicy chicken thighs with skin that actually stays crispy.
Let’s face it, chicken breasts are great, but they can be dry. They can be boring. Chicken thighs, on the other hand, have that beautiful fat content that keeps them moist even when you overcook them slightly. This Best Oven Baked Chicken Thighs recipe isn’t just about cooking meat; it’s about mastering the balance between crunch and tenderness. I’ve tested this method over a dozen times, adjusting the temperature and the rub, until I landed on what I genuinely believe is the gold standard for weeknight dinners.
You know how some recipes feel like they require a culinary degree? This one doesn’t. It’s simple, forgiving, and incredibly rewarding. Whether you’re feeding a picky family or just trying to treat yourself to a proper meal after a long week, these thighs deliver. The skin gets shatteringly crisp while the meat underneath stays succulent and flavorful. It’s the kind of dinner that makes you feel like a pro chef, even if you’re just following instructions. Honestly, once you try this, you might never go back to the dry breast again.
I love that this Best Oven Baked Chicken Thighs dish is versatile enough to be served with a light salad on a hot day or mashed potatoes on a cold night. It’s reliable, it’s delicious, and it’s got that home-cooked soul that we all crave. Plus, the leftovers are amazing the next day, making lunch prep a breeze. Let’s get into why this specific method works so well for your home kitchen.
Why You’ll Love This Recipe
After years of cooking, testing, and yes, failing a few times, I’ve learned that the secret to great chicken isn’t fancy equipment—it’s understanding the cut. Chicken thighs are forgiving. They don’t dry out easily. This recipe takes advantage of that natural resilience. I’ve shared this with friends, family, and even skeptical husbands who claim they “don’t like chicken,” and every single person has asked for the recipe. That’s the power of properly cooked dark meat.
- Quick & Easy: You can have this on the table in under 45 minutes, including prep time. It’s perfect for those busy weeknights when you’re staring at the clock, wondering how to get dinner done before the kids get home.
- Simple Ingredients: You don’t need to run to a specialty store. The spice rub uses pantry staples like paprika, garlic powder, onion powder, and dried herbs. You likely already have everything you need in your cupboard right now.
- Perfect for Meal Prep: These thighs hold up beautifully in the fridge for up to four days. They reheat well in the oven, keeping their texture intact, which makes them ideal for preparing ahead of time.
- Crowd-Pleaser: Kids love the crispy skin, and adults love the juicy meat. It’s a universal favorite that works for potlucks, family dinners, or even a date night in.
- Unbelievably Delicious: The combination of high heat and proper drying of the skin creates a texture that is next-level. It’s not just cooked chicken; it’s an experience.
What makes this recipe different from the rest is the attention to detail in the preparation. Many recipes skip the step of patting the chicken dry, which is crucial for crispiness. This method ensures that the skin crisps up instead of steaming. It’s a small step, but it makes a massive difference. I’ve also found that letting the chicken sit in the fridge uncovered for a while before baking helps dry out the skin further. It’s a pro tip that elevates the result without adding any extra effort.
Emotionally, this dish brings a sense of comfort and satisfaction. It’s the kind of meal that reminds you of home, of Sunday roasts, of care and attention. It’s not just fuel; it’s nourishment for the soul. When you bite into that crispy skin and taste the tender, seasoned meat inside, you’ll understand why this is my go-to recipe. It’s reliable, delicious, and always a hit. You’ll find yourself making it again and again, not because you have to, but because you want to.
What Ingredients You Will Need
This recipe relies on high-quality, simple ingredients to deliver bold flavor and satisfying texture. The beauty of this Best Oven Baked Chicken Thighs dish is that it doesn’t require exotic spices or hard-to-find items. Everything you need is likely already in your kitchen, or easily available at any local grocery store. The key is using fresh herbs and good quality spices to build a robust flavor profile.
- Chicken Thighs: Bone-in, skin-on thighs are essential here. Boneless thighs can work, but they won’t get the same crispy skin. Look for thighs that are relatively uniform in size so they cook evenly. I prefer organic, pasture-raised chicken when possible, as the flavor is noticeably richer.
- Olive Oil: Extra virgin olive oil helps conduct heat and helps the spices adhere to the chicken. It also adds a subtle fruity note that complements the savory spices. Use about two tablespoons for four to six thighs.
- Garlic Powder: Fresh garlic can burn at high temperatures, so garlic powder is the way to go for a consistent, savory flavor. It infuses the skin with that classic aromatic taste.
- Onion Powder: Similar to garlic, onion powder adds depth and sweetness without the risk of burning. It rounds out the flavor profile nicely.
- Paprika: I recommend using smoked paprika if you have it. It adds a subtle smokiness that mimics grilling. If you don’t have smoked paprika, sweet paprika works well too. It also gives the chicken that beautiful golden-red color.
- Dried Thyme: Fresh thyme can be used, but dried thyme is more concentrated and distributes evenly. It adds an earthy, slightly floral note that pairs perfectly with chicken.
- Dried Rosemary: Another classic herb for poultry. Crush the leaves slightly between your fingers to release their oils before adding them to the mix. It adds a piney, robust flavor.
- Salt and Black Pepper: Don’t skimp on these. Kosher salt is best because it’s easier to control and doesn’t contain additives. Freshly cracked black pepper adds a nice heat and aroma.
- Lemon: Optional, but highly recommended. Squeezing fresh lemon juice over the chicken before or after baking adds brightness and cuts through the richness of the skin.
I’ve found that mixing the spices in a small bowl before sprinkling them over the chicken ensures even distribution. This prevents having a mouthful of pure paprika or thyme. Also, if you have a specific brand of spices you trust, stick with it. I use McCormick for convenience, but local spice shops often have fresher, more aromatic blends. For the olive oil, I prefer a light extra virgin oil that won’t overpower the other flavors. Remember, the quality of your ingredients matters, but even simple store-bought spices can make a delicious meal if used correctly.
How Do I Get the Skin Crispy?
The secret is drying. Pat the chicken thoroughly with paper towels. Let it sit in the fridge uncovered for an hour if you can. High heat is also crucial. Start the oven at 425°F (220°C).
Can I Use Boneless Thighs?

You can, but the skin won’t crisp up the same way. Boneless thighs cook faster, so reduce the baking time by about 5-10 minutes. They will still be juicy, but you’ll miss out on that crunchy texture.
What If I Don’t Have Smoked Paprika?
Sweet paprika is a fine substitute. You can also add a pinch of cayenne pepper if you want a little extra heat to compensate for the lack of smokiness. The flavor will be slightly different but still delicious.
How Do I Know When It’s Done?
Use a meat thermometer. The internal temperature should reach 165°F (74°C). Insert it into the thickest part of the meat, avoiding the bone. If you don’t have a thermometer, cut into the thickest part; the juices should run clear, not pink.
Can I Make This Ahead of Time?
Yes! You can season the chicken and store it in the fridge for up to 24 hours before baking. This actually helps the flavors penetrate the meat. Just take it out of the fridge 20 minutes before baking to take the chill off.
Equipment Needed
You don’t need a fancy kitchen to make this recipe. A few basic tools will get the job done. A rimmed baking sheet is essential. I recommend a heavy-duty one, like a Nordic Ware or a stainless steel sheet, because it distributes heat evenly. Avoid thin, flimsy sheets that can warp or burn the chicken.
A wire rack that fits inside your baking sheet is a game-changer. It allows air to circulate under the chicken, ensuring the bottom skin gets crispy too. If you don’t have a rack, you can place the chicken directly on the sheet, but you’ll need to flip them halfway through for even browning. I’ve tried both methods, and the rack is definitely superior for crispiness.
Paper towels are necessary for drying the chicken. Don’t skip this step! A good pair of kitchen tongs will help you handle the chicken without burning your fingers. A small bowl for mixing your spices and a pastry brush for applying the olive oil are also helpful. If you don’t have a pastry brush, you can use your hands or a spoon.
A meat thermometer is the most important tool for ensuring food safety and perfect doneness. Instant-read thermometers are affordable and reliable. I use an Thermapen, but any digital thermometer will work. Finally, a sharp knife is useful if you need to trim any excess fat or make small incisions in the meat for better seasoning penetration.
For budget-friendly options, look for sales on baking sheets at thrift stores or discount retailers. A simple aluminum foil-lined sheet can work in a pinch, but it won’t give you the same crisp results. Cleaning is easier with foil, but the trade-off in texture is worth noting. I always wash my equipment immediately after use to prevent stuck-on seasoning from becoming a nightmare to scrub later.
Preparation Method
Preheat your oven to 425°F (220°C). This high temperature is crucial for rendering the fat and crisping the skin. While the oven heats up, prepare your chicken. Take the thighs out of the packaging and place them on a clean kitchen counter. Using paper towels, pat each thigh dry thoroughly. This is the most important step for achieving crispy skin. Remove any excess fat or loose skin bits if you prefer, but leave the main skin layer intact.
In a small bowl, combine one teaspoon of garlic powder, one teaspoon of onion powder, one teaspoon of smoked paprika, one teaspoon of dried thyme, half a teaspoon of dried rosemary, one teaspoon of kosher salt, and half a teaspoon of black pepper. Mix these spices together with a fork until well blended. This ensures that every bite has a consistent flavor profile.
Place the dried chicken thighs in a large mixing bowl. Drizzle two tablespoons of olive oil over them. Use your hands or tongs to toss the chicken, ensuring each piece is lightly coated in oil. The oil helps the spices stick and promotes browning. Sprinkle the spice mixture evenly over the chicken. Use your hands to rub the spices into the skin and meat, making sure to get into all the nooks and crannies. Don’t be shy with the seasoning; chicken thighs can handle a good amount of flavor.
Once seasoned, arrange the chicken thighs on your prepared baking sheet or wire rack. Make sure they are not touching each other. Crowding the pan will cause the chicken to steam instead of roast, resulting in soggy skin. If you have a lot of chicken, use two baking sheets or bake in batches. Place the thickest parts of the thighs towards the center of the pan, where the heat is most consistent.
Transfer the baking sheet to the preheated oven. Bake for 35-40 minutes. At the 20-minute mark, check the chicken. If the skin is browning too quickly, you can loosely tent it with aluminum foil. After 35 minutes, check the internal temperature with a meat thermometer. It should read 165°F (74°C). If it’s not quite there, continue baking in 5-minute increments.
Once done, remove the chicken from the oven. Let it rest for 5-10 minutes before serving. This allows the juices to redistribute throughout the meat, keeping it juicy. While the chicken rests, you can squeeze fresh lemon juice over the top if you like. Garnish with fresh parsley or thyme sprigs for a pop of color. Serve immediately while the skin is still crisp. The aroma alone will have everyone coming to the table.
Why Resting is Important
Resting the chicken allows the juices, which have been driven to the center by the heat, to spread back out. If you cut into it immediately, the juices will spill out, leaving the meat dry. A quick 5-minute rest makes a huge difference in texture.
What If the Skin Isn’t Crispy?
If the skin is soft, it’s likely because the chicken wasn’t dry enough or the oven wasn’t hot enough. Next time, pat it drier and ensure your oven is fully preheated. You can also broil for the last 2-3 minutes to crisp it up, but watch it closely to avoid burning.
How Do I Flip the Chicken?
If you’re not using a wire rack, flip the chicken halfway through baking. Use tongs to gently turn each piece over. This ensures even browning on both sides. If using a rack, flipping isn’t necessary, as air circulates underneath.
Can I Add Vegetables?
Absolutely! Toss chopped potatoes, carrots, or Brussels sprouts with olive oil and salt on the same baking sheet. They’ll roast alongside the chicken, absorbing the flavorful drippings. Just make sure they are cut into uniform pieces for even cooking.
How Do I Store Leftovers?
Let the chicken cool completely, then store it in an airtight container in the fridge for up to four days. Reheat in the oven at 350°F (175°C) for 10-15 minutes to restore crispiness. Avoid the microwave, as it will make the skin soggy.
Cooking Tips & Techniques
One of the biggest mistakes people make with chicken thighs is overcrowding the pan. When pieces are too close together, they release moisture and steam each other. This prevents the Maillard reaction, which is responsible for that delicious browning and crispiness. Always give each piece some space. If you’re cooking for a large family, use two sheets or bake in batches. It’s worth the extra effort.
Another common error is not drying the chicken thoroughly. Moisture is the enemy of crispiness. Even after patting dry, if the chicken feels slick, it needs more time. I often let the seasoned chicken sit in the fridge uncovered for an hour before baking. This air-drying process, similar to making corned beef brisket, helps form a pellicle that crisps up beautifully. It’s a small step that yields big results.
Temperature control is key. Make sure your oven is fully preheated before putting the chicken in. An oven thermometer is a cheap investment that can save you from undercooked or overcooked meals. If your oven runs hot, you might need to lower the temperature by 25°F. Conversely, if it runs cool, increase it slightly. Every oven is different, so pay attention to your chicken.
Don’t be afraid to taste your spice mix before applying it. Adjust the salt or heat to your preference. If you like it spicy, add a pinch of cayenne or red pepper flakes. If you prefer mild, stick to the base spices. Experimenting with different herb combinations can also keep the recipe interesting. Try adding oregano or sage for a Mediterranean twist.
Finally, trust your senses. Look at the color, smell the aroma, and check the texture. The skin should be golden brown and crisp to the touch. The meat should pull away slightly from the bone. These cues are more reliable than the clock alone. Cooking is a skill that improves with practice, and each batch of chicken thighs will teach you something new about your oven and your preferences.
What Happens If I Undercook It?
Undercooked chicken is a food safety risk. Always ensure the internal temperature reaches 165°F (74°C). If you cut into it and see pink meat or clear juices with a pink tint, return it to the oven for a few more minutes.
Can I Use a Cast Iron Skillet?
Yes! A cast iron skillet is excellent for this recipe. It retains heat well and can go from stovetop to oven. Sear the chicken skin-side down first for extra crispiness, then transfer the skillet to the oven to finish cooking. It’s a great method for added flavor.
Why Is My Chicken Dry?
Overcooking is the most common cause. Chicken thighs are forgiving, but they can still dry out if baked for too long at high heat. Use a thermometer to check doneness early. Also, ensure you’re not using boneless, skinless thighs, which cook faster and have less fat.
How Do I Prevent Burning?
If the skin is browning too fast, tent the pan with foil. You can also move the pan to a lower rack in the oven. Keeping an eye on the chicken during the last 10 minutes of cooking is essential.
Can I Marinate the Chicken?
Yes, but keep it short. A 30-minute marinade with olive oil, lemon, and herbs can add extra flavor. Avoid acidic marinades like vinegar or lemon juice for too long, as they can make the meat mushy. Pat dry again before baking to ensure crispiness.
Variations & Adaptations
One of the best things about this recipe is its versatility. You can easily adapt it to suit different tastes or dietary needs. For a spicy kick, add a teaspoon of cayenne pepper or red pepper flakes to the spice mix. This is great for those who love a bit of heat with their dinner. I often add a pinch of chili powder for a smoky, spicy twist that pairs well with the paprika.
If you’re looking for a Mediterranean flair, swap the thyme and rosemary for dried oregano and add a squeeze of lemon juice and some chopped fresh parsley after baking. You can also add some Kalamata olives or sun-dried tomatoes to the pan for extra flavor. This variation is light, fresh, and perfect for summer dinners.
For a Asian-inspired twist, replace the dried herbs with a mixture of ginger powder, five-spice powder, and a little soy sauce in the olive oil. Garnish with sesame seeds and green onions. This creates a completely different flavor profile that is equally delicious. It’s a great way to use up leftover soy sauce or ginger.
Gluten-free and dairy-free diets are no problem here. The base recipe is naturally gluten-free and dairy-free. Just ensure your spices are certified gluten-free if you have celiac disease. For a low-carb option, skip any starchy sides and serve with a large green salad or roasted vegetables like broccoli or cauliflower.
I once tried adding a honey glaze in the last 5 minutes of baking. It caramelized beautifully and added a sweet contrast to the savory spices. It was a hit with my kids, who usually prefer plain chicken. Experimenting with different glazes or rubs can keep the recipe exciting. Try a brown sugar and mustard rub for a BBQ-style flavor. The possibilities are endless, so don’t be afraid to make it your own.
How Do I Make It Spicy?
Add cayenne pepper, red pepper flakes, or a dash of hot sauce to the spice mix. Start with a quarter teaspoon and adjust to your taste. You can also serve with a spicy dipping sauce on the side.
Can I Make It Mediterranean?
Swap the herbs for oregano and add lemon zest to the rub. Garnish with fresh parsley and serve with hummus and pita bread. It’s a fresh, zesty variation that’s perfect for warmer weather.
What About Asian Flavors?
Use ginger powder, five-spice, and soy sauce in the rub. Garnish with sesame seeds and green onions. This creates a savory, umami-rich dish that’s different from the traditional herb profile.
Is It Gluten-Free?
Yes, the base recipe is naturally gluten-free. Just check your spice labels to ensure they haven’t been processed in facilities that handle gluten. Serve with gluten-free sides like rice or roasted potatoes.
Can I Add a Glaze?
Brush with honey, maple syrup, or BBQ sauce in the last 5 minutes of baking. Watch closely to prevent burning. The sugar will caramelize quickly, creating a sticky, sweet crust.
Serving & Storage Suggestions
These chicken thighs are best served hot, straight from the oven. The skin is at its crispiest immediately after cooking, so don’t let them sit too long before eating. For presentation, arrange the thighs on a platter and garnish with fresh herbs like parsley or thyme. A squeeze of fresh lemon juice just before serving adds brightness and cuts through the richness of the skin.
For sides, these thighs pair well with a variety of dishes. Roasted vegetables like carrots, potatoes, or Brussels sprouts are a classic choice. They can be cooked on the same sheet pan for easy cleanup. A simple green salad with a vinaigrette dressing also complements the savory chicken nicely. For a heartier meal, serve with mashed potatoes, rice, or crusty bread to soak up the juices.
Leftovers can be stored in an airtight container in the refrigerator for up to four days. To reheat, use the oven or an air fryer at 350°F (175°C) for 10-15 minutes. This will restore the crispiness of the skin. Avoid using the microwave, as it will make the skin soggy and the meat rubbery. If you must use the microwave, cover the chicken with a damp paper towel and heat in short intervals.
For freezing, wrap the cooled chicken tightly in plastic wrap and then in aluminum foil, or place it in a freezer-safe bag. It can be frozen for up to three months. Thaw overnight in the fridge before reheating. Note that the texture of the skin may change slightly after freezing, but the flavor will remain excellent.
Over time, the flavors of the chicken may meld and deepen, making leftovers even more flavorful. I often find that the second day’s chicken tastes even better as the spices have had more time to penetrate the meat. Just be sure to store it properly to maintain freshness. Enjoy your Best Oven Baked Chicken Thighs as a comforting, delicious meal any day of the week.
How Do I Reheat Without Drying?
Reheat in the oven or air fryer at 350°F (175°C) for 10-15 minutes. This method restores the crispiness. Avoid the microwave, which makes the skin soggy. If using a microwave, cover with a damp paper towel.
What Sides Go Best?
Roasted potatoes, green beans, or a simple salad are great options. You can also serve with rice, quinoa, or crusty bread. The chicken pairs well with both light and hearty sides.
Can I Freeze the Chicken?
Yes, wrap tightly in plastic and foil, or use a freezer bag. Freeze for up to three months. Thaw in the fridge before reheating. The skin texture may change slightly, but the flavor remains good.
How Long Do Leftovers Last?
Stored in an airtight container, leftovers last up to four days in the fridge. For best quality, reheat in the oven or air fryer to maintain crispiness.
Do Flavors Improve Over Time?
Yes, the spices continue to penetrate the meat, making leftovers flavorful. However, the skin will lose some crispiness. Reheating properly helps restore texture.
Nutritional Information & Benefits
Chicken thighs are not only delicious but also nutritious. They are a great source of high-quality protein, which is essential for muscle repair and growth. Each serving provides around 25-30 grams of protein, depending on the size of the thigh. They are also rich in B vitamins, particularly B12, which supports energy metabolism and brain health.
Unlike chicken breasts, thighs contain more healthy fats, including monounsaturated fats, which are beneficial for heart health. These fats also help you feel fuller for longer, reducing the urge to snack between meals. The skin, while higher in calories, adds flavor and satiety. If you’re watching your calorie intake, you can remove the skin before eating, but it’s not necessary for overall health.
This recipe is naturally low-carb and gluten-free, making it suitable for various dietary preferences. It’s also dairy-free, which is great for those with lactose intolerance. The spices used, such as garlic and paprika, have anti-inflammatory properties, adding extra health benefits to the dish.
From a personal wellness perspective, I find that incorporating more dark meat into my diet helps me stay satisfied and energized. It’s a balanced choice that fits into a healthy lifestyle. Of course, portion control is key, but these thighs are lean enough to be part of a weight management plan. Enjoy them as part of a balanced meal with vegetables and whole grains for optimal nutrition.
Is It High in Protein?
Yes, chicken thighs are an excellent source of protein, providing around 25-30 grams per serving. This supports muscle maintenance and satiety.
Are They Healthy?
Yes, they contain healthy fats and essential nutrients like B vitamins and iron. The skin adds flavor and satiety, but can be removed if preferred.
Is It Gluten-Free?
The base recipe is naturally gluten-free. Just ensure your spices are certified gluten-free to avoid cross-contamination.
What Vitamins Are in Chicken?
Chicken thighs are rich in B vitamins, particularly B12, which supports energy and brain function. They also contain niacin and B6.
Can I Eat the Skin?
Yes, the skin adds flavor and healthy fats. It’s part of the crispiness that makes this recipe special. Remove it if you’re strictly counting calories.
Conclusion
Making the Best Oven Baked Chicken Thighs at home is easier than you think, and the results are worth every minute. With crispy skin, juicy meat, and a flavorful spice rub, this dish is a weeknight winner that never fails to impress. I hope you try this recipe and find it as comforting and delicious as I do. It’s become a staple in my kitchen, and I’m confident it will become one in yours too.
Feel free to customize the spices and sides to suit your taste. Whether you prefer it spicy, herby, or sweet, this method is flexible enough to accommodate your preferences. Don’t be afraid to experiment and make it your own. Cooking should be fun and enjoyable, not stressful.
If you make this recipe, I’d love to hear how it turns out! Please leave a comment below with your thoughts or share a photo of your creation. Your feedback helps me improve and inspires others to try it. Also, consider sharing this recipe with friends and family who might need a easy, delicious dinner idea. Let’s spread the joy of good food together.
Thank you for joining me in the kitchen. I hope this recipe brings you and your loved ones many happy meals. Happy cooking!
FAQs
What is the best temperature to bake chicken thighs?
For crispy skin and juicy meat, bake at 425°F (220°C). This high heat renders the fat and crisps the skin effectively.
How do I know when chicken thighs are done?
Use a meat thermometer. The internal temperature should reach 165°F (74°C). Insert it into the thickest part, avoiding the bone.
Can I bake chicken thighs on a baking sheet without a rack?
Yes, but flip them halfway through for even browning. A wire rack is better for crispiness as it allows air circulation.
How long does it take to bake chicken thighs?
It takes about 35-40 minutes at 425°F (220°C), depending on the size of the thighs. Always check the temperature.
Can I use boneless chicken thighs for this recipe?
You can, but the skin won’t crisp up. Reduce baking time by 5-10 minutes. Bone-in, skin-on is recommended for best results.
Pin This Recipe!


Best Oven Baked Chicken Thighs: Easy Crispy Dinner
- Total Time: 45 minutes
- Yield: 4 servings 1x
Description
Juicy, bone-in chicken thighs with shatteringly crispy skin, seasoned with a simple blend of pantry spices. This easy weeknight dinner is forgiving, flavorful, and perfect for meal prep.
Ingredients
- 4–6 bone-in, skin-on chicken thighs
- 2 tablespoons extra virgin olive oil
- 1 teaspoon garlic powder
- 1 teaspoon onion powder
- 1 teaspoon smoked paprika (or sweet paprika)
- 1 teaspoon dried thyme
- 0.5 teaspoon dried rosemary
- 1 teaspoon kosher salt
- 0.5 teaspoon black pepper
- 1 lemon (optional, for squeezing)
Instructions
- Preheat oven to 425°F (220°C).
- Pat chicken thighs thoroughly dry with paper towels to ensure crispy skin.
- In a small bowl, mix garlic powder, onion powder, smoked paprika, dried thyme, dried rosemary, kosher salt, and black pepper.
- Place chicken in a large bowl, drizzle with olive oil, and toss to coat evenly.
- Sprinkle spice mixture over chicken and rub into the skin and meat.
- Arrange chicken on a baking sheet or wire rack, ensuring pieces are not touching.
- Bake for 35-40 minutes, or until internal temperature reaches 165°F (74°C).
- If skin is browning too quickly, tent loosely with aluminum foil.
- Remove from oven and let rest for 5-10 minutes before serving.
- Squeeze fresh lemon juice over the top if desired and garnish with fresh herbs.
Notes
For extra crispiness, pat chicken dry and let it sit uncovered in the fridge for an hour before baking. Ensure chicken pieces are not crowded on the pan to prevent steaming. If using boneless thighs, reduce baking time by 5-10 minutes.
- Prep Time: 10 minutes
- Cook Time: 35-40 minutes
- Category: Main Course
- Cuisine: American
Nutrition
- Serving Size: 1-2 thighs per servi
- Calories: 350
- Sodium: 450
- Fat: 22
- Saturated Fat: 6
- Carbohydrates: 2
- Fiber: 0.5
- Protein: 28
Keywords: oven baked chicken thighs, crispy chicken, easy dinner, weeknight meals, meal prep, gluten-free, dairy-free, high protein