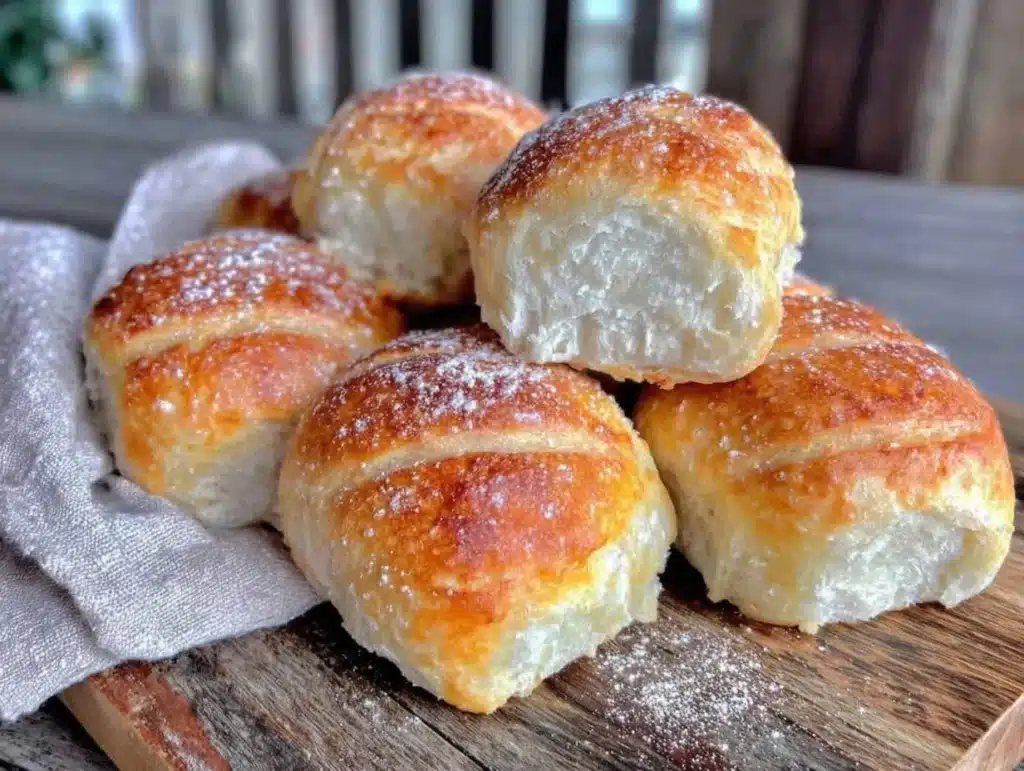
Let’s be honest for a second. Buying a package of six sad, stale hoagie rolls from the store costs nearly as much as making a batch from scratch. I know, right? It feels like a rip-off. The last time I stood in the bakery aisle, I nearly choked on my own disbelief at the price tag. That was the moment I decided enough was enough. I wanted soft, pillowy bread that could handle a heavy sub without falling apart, but I didn’t want to break the bank doing it.
So, I went back to the drawing board. I tested dozens of yeast dough recipes, tweaking hydration levels and proofing times until I hit that sweet spot. What I ended up with is honestly the best soft homemade hoagie rolls I’ve ever made. They are incredibly cheap to make, using just five simple ingredients you probably already have in your pantry. No fancy flours or expensive starters required.
These rolls are the backbone of my weekly meal prep. Whether I’m making turkey subs for the kids’ lunchboxes or building massive roast beef sandwiches for dinner, these buns hold up perfectly. They stay soft for days, too, which is a miracle in my house. Once you try making them, you’ll never go back to the store-bought stuff again. Trust me on this one.
Why You’ll Love This 5-Ingredient Recipe
After baking these rolls over two dozen times, I can confidently say they are the ultimate budget-friendly hero. They aren’t just cheap; they are genuinely delicious. Here is why this recipe has earned a permanent spot in my rotation:
- Quick & Easy: You can have these from bowl to oven in under two hours. That is perfect for busy weeknights when you need dinner on the table fast.
- Simple Ingredients: You likely have everything right now. Flour, yeast, sugar, salt, and water. That’s it. No fancy grocery trips or expensive specialty items needed.
- Perfect for Meal Prep: These rolls are sturdy enough to hold wet ingredients like tomato slices or heavy meats without getting soggy or falling apart.
- Crowd-Pleaser: Kids love them because they are soft and mild. Adults love them because they taste fresh and homemade. It’s a win-win.
- Unbelievably Delicious: The texture is next-level comfort food. Crispy on the outside, soft and chewy on the inside. It’s the kind of bread that makes you close your eyes after the first bite.
- Cost-Effective: This batch costs less than $2 to make. That feeds a family of four easily, leaving money in your pocket for other things.
What makes this recipe different is the balance. Many cheap bread recipes turn out dense or dry. Not these. By letting the dough rest properly and using just the right amount of hydration, I’ve created a roll that feels premium but costs pennies. It’s comfort food reimagined for the budget-conscious cook. It’s also great for impressing guests without stress, turning a simple sandwich into something memorable.
What Ingredients You Will Need
This recipe relies on humble, pantry-staple ingredients to deliver bold flavor and satisfying texture without the fuss. You don’t need to hunt down rare items. Here is exactly what you need to get started:
- All-Purpose Flour (500g / 4 cups): The base of the dough. I recommend a standard brand like Gold Medal or King Arthur for consistent results. Do not use self-rising flour, or the texture will be off.
- Active Dry Yeast (7g / 1 packet): This is what makes the rolls rise. Instant yeast works too, but active dry needs that warm water boost. Check the expiration date on your yeast packet to ensure it’s still active.
- Warm Water (300ml / 1 ¼ cups): This activates the yeast. It should be warm to the touch, like baby bathwater, not hot. If it’s too hot, you’ll kill the yeast. If it’s too cold, the dough won’t rise properly.
- Sugar (2 tbsp): A little sweetness helps the yeast feed and gives the crust a nice golden color. Granulated white sugar works best here.
- Salt (1.5 tsp): Essential for flavor. Don’t skip this, or the rolls will taste bland. Fine sea salt or table salt both work fine.
- Olive Oil or Vegetable Oil (1 tbsp): Adds moisture and keeps the crumb soft. Olive oil adds a nice subtle flavor, but neutral oil works just as well if you prefer a plain taste.
Optional but recommended: Flour for dusting. You might need a little extra flour to keep the dough from sticking to your hands while you shape them. Keep it minimal though; too much flour makes the rolls dense.
Substitution Tips
If you are out of sugar, honey works as a substitute. For the oil, melted butter adds a richer flavor, though it changes the texture slightly. If you want a healthier twist, you can swap half the all-purpose flour for whole wheat flour, but the rolls will be denser.
Equipment Needed

You don’t need a fancy stand mixer for this recipe. A large mixing bowl and a wooden spoon are all you really need. However, having a few specific tools makes the process smoother.
Mixing Bowl: Use a bowl large enough to hold the dough as it doubles in size. A 5-quart bowl is ideal.
Chef’s Knife or Bench Scraper: These help you divide the dough evenly. A bench scraper is great for cleaning your counter, but a knife works in a pinch.
Baking Sheet: A standard half-sheet pan is perfect. Line it with parchment paper for easy cleanup. This prevents sticking and makes transferring the rolls much easier.
Oven Thermometer: This is a budget-friendly tool that pays for itself. Ovens are often inaccurate, and an accurate temperature ensures your rolls bake evenly.
Pastry Brush: Use this to brush the tops with water or oil before baking. It helps create that nice, shiny crust.
If you don’t have a stand mixer, don’t worry. Hand-kneading builds character and ensures you know exactly when the dough is ready. It takes about ten minutes, which is a good arm workout.
Preparation Method
Let’s get into the nitty-gritty. Making these rolls is easier than you think. Here is how to do it step-by-step.
- Activate the Yeast (5 minutes): In your mixing bowl, combine the warm water and sugar. Sprinkle the yeast on top and stir gently. Let it sit for about 5-10 minutes. You should see foam form on the surface. If it doesn’t foam, your yeast might be dead. Start over with fresh yeast.
- Mix the Dough (5 minutes): Add the salt and oil to the yeast mixture. Then, gradually add the flour. Start with about half the flour and mix with a wooden spoon. As the dough thickens, switch to using your hands. Add the rest of the flour slowly. You want a dough that is slightly sticky but pulls away from the sides of the bowl.
- Knead the Dough (8-10 minutes): Turn the dough out onto a lightly floured surface. Knead by pushing the dough away from you with the heel of your hand, then folding it back over itself. Rotate and repeat. If it’s too sticky, add a sprinkle of flour. If it’s too dry, add a teaspoon of water. The dough should feel smooth and elastic. This step develops the gluten, which gives the rolls their chew.
- First Rise (1 hour): Shape the dough into a ball and place it back in the bowl. Cover it with a damp kitchen towel or plastic wrap. Let it rise in a warm, draft-free spot for about 1 hour, or until it has doubled in size. This is a great time to prep your sandwich ingredients.
- Shape the Rolls (10 minutes): Punch down the risen dough to release air bubbles. Divide the dough into 8 equal pieces. Roll each piece into a long oval shape, about 6 inches long. Pinch the ends to seal them. Place them seam-side down on your parchment-lined baking sheet, leaving about an inch of space between each roll.
- Second Rise (30 minutes): Cover the shaped rolls loosely with the towel again. Let them rise for another 30 minutes. They should look puffy and soft. Preheat your oven to 375°F (190°C) during the last 15 minutes of this rise.
- Bake (15-18 minutes): Brush the tops lightly with water or oil. Bake in the preheated oven for 15-18 minutes. The rolls are done when they are golden brown and sound hollow when you tap the bottom. If they sound dull, they need more time.
- Cool (15 minutes): Remove the rolls from the oven and let them cool on a wire rack. This stops the cooking process and prevents the bottoms from getting soggy. Wait at least 15 minutes before slicing.
Troubleshooting Tips
If your rolls are flat, your yeast might have been old or the water too hot. If they are dense, you may have added too much flour during kneading. Trust your senses. The dough should feel like a soft earlobe.
Cooking Tips & Techniques
Here are some pro tips to ensure your homemade hoagie rolls turn out perfect every time.
Water Temperature Matters: Use a kitchen thermometer if you have one. The water should be between 105°F and 115°F (40°C-46°C). Too hot kills the yeast; too cold won’t activate it enough.
Don’t Skip the Kneading: I know it’s tedious, but kneading is non-negotiable for soft rolls. Under-kneaded dough results in dense, heavy bread. Over-kneaded dough can become tough. Aim for that smooth, elastic texture.
Watch the Oven: Every oven is different. Check your rolls at the 15-minute mark. If they are browning too fast, tent them with aluminum foil. This prevents burning while the inside finishes cooking.
Steam for Crispiness: For a crispier crust, place a pan of hot water on the bottom rack of your oven while the rolls bake. The steam helps the crust set and stay crisp.
Storage Hack: Store leftover rolls in an airtight container at room temperature for up to 3 days. For longer storage, freeze them. Thaw at room temperature or warm them in the oven for a few minutes.
Personal Lesson: I once rushed the second rise because I was hungry. The rolls came out dense and flat. Never rush the rise. Patience is key in bread making.
Variations & Adaptations
While the basic recipe is fantastic, here are some ways to tweak it up.
Garlic Herb Rolls: Add 1 teaspoon of dried garlic powder and 1 teaspoon of dried Italian herbs to the flour before mixing. This adds a savory punch that pairs well with hearty sandwiches.
Whole Wheat Option: Swap half the all-purpose flour for whole wheat flour. This adds fiber and a nuttier flavor. You may need to add a tablespoon more water as whole wheat absorbs more liquid.
Seeded Rolls: Press sesame seeds, poppy seeds, or everything bagel seasoning onto the tops before baking. This adds texture and visual appeal.
Gluten-Free: Use a 1-to-1 gluten-free flour blend. Note that the texture will be different, as gluten-free dough doesn’t develop elasticity the same way. It will be more cake-like.
Dairy-Free: This recipe is naturally dairy-free. Just ensure your yeast and sugar are vegan-friendly if that matters to you.
Serving & Storage Suggestions
These rolls are best served fresh out of the oven. Slice them horizontally and fill them with your favorite sandwich ingredients. They pair wonderfully with crispy garlic chicken subs, roast beef with horseradish sauce, or simple turkey and cheese.
For storage, keep them in a plastic bag or airtight container at room temperature for up to 3 days. They stay soft and fresh. If you live in a humid climate, store them in the refrigerator to prevent mold, though they may stale faster.
To freeze, wrap individual rolls in plastic wrap and place them in a freezer-safe bag. They will keep for up to 3 months. To reheat, unwrap and warm in a 350°F oven for 5-10 minutes. This restores the soft texture. Avoid microwaving, as it makes them chewy and tough.
The flavors develop over time. Letting the rolls sit for a day after baking actually allows the crumb to soften further. They are great for meal prep sandwiches made ahead of time.
Nutritional Information & Benefits
Each roll contains approximately 150 calories. They are a good source of carbohydrates for energy. The all-purpose flour provides some protein, though it is not a complete protein source on its own.
These rolls are low in fat, especially if you use a minimal amount of oil. They are naturally cholesterol-free. For those watching their sodium, you can reduce the salt to 1 teaspoon, though this may affect the flavor.
They are not gluten-free or vegan by default. For dietary restrictions, use the substitutions mentioned above. From a wellness perspective, homemade bread allows you to control the ingredients. No preservatives or added sugars beyond what you choose. It’s a healthier alternative to store-bought bread, which often contains preservatives to extend shelf life.
Conclusion
Making soft homemade hoagie rolls is easier than you think, and the results are worth every minute. These 5-ingredient rolls are cheap, delicious, and versatile. They fit perfectly into a budget-friendly meal plan without sacrificing taste or quality.
I encourage you to try this recipe and customize it to your liking. Add herbs, seeds, or different flours to make it your own. I love these rolls because they bring a sense of accomplishment to my cooking. There is nothing quite like slicing into a warm, fresh roll you made yourself.
Give this recipe a try and let me know how it turns out. Share your variations in the comments below. Happy baking!
FAQs
Can I use instant yeast instead of active dry yeast?
Yes, you can. You can mix instant yeast directly with the flour. You may not need to proof it in water first, but it doesn’t hurt to do so to ensure it’s active.
Why are my rolls dense?
This usually happens if you add too much flour during kneading or if the yeast was old. Make sure your dough is slightly sticky and check your yeast expiration date.
How do I keep the rolls soft?
Store them in an airtight container at room temperature. If you need to refrigerate them, bring them to room temperature before serving. Freezing is also a great option for long-term storage.
Can I make these rolls ahead of time?
Yes. You can shape the rolls and let them rise in the refrigerator overnight. In the morning, let them come to room temperature and finish rising before baking.
What is the best way to slice hoagie rolls?
Use a serrated bread knife. Slice horizontally but not all the way through, creating a hinge. This makes them easier to fill and eat without falling apart.
Pin This Recipe!


Soft Homemade Hoagie Rolls: 5 Ingredients for Cheap!
- Total Time: 2 hours 15 minutes
- Yield: 8 servings 1x
Description
These soft, pillowy homemade hoagie rolls are incredibly cheap to make using just five simple pantry ingredients. They are sturdy enough for heavy subs, stay soft for days, and offer a perfect balance of crispy exterior and chewy interior.
Ingredients
- 500g (4 cups) All-Purpose Flour
- 7g (1 packet) Active Dry Yeast
- 300ml (1 ¼ cups) Warm Water
- 2 tbsp Sugar
- 1.5 tsp Salt
- 1 tbsp Olive Oil or Vegetable Oil
- Flour for dusting (optional)
Instructions
- Activate the yeast: In a mixing bowl, combine warm water and sugar. Sprinkle yeast on top and stir gently. Let sit for 5-10 minutes until foamy.
- Mix the dough: Add salt and oil to the yeast mixture. Gradually add flour, starting with half and mixing with a wooden spoon. Switch to hands as it thickens, adding the rest slowly until the dough is slightly sticky but pulls away from the bowl sides.
- Knead the dough: Turn dough onto a lightly floured surface. Knead for 8-10 minutes by pushing away and folding back until smooth and elastic.
- First rise: Shape dough into a ball, place in the bowl, cover with a damp towel or plastic wrap, and let rise in a warm spot for 1 hour or until doubled.
- Shape the rolls: Punch down the dough and divide into 8 equal pieces. Roll each into a 6-inch oval, pinch ends to seal, and place seam-side down on a parchment-lined baking sheet with space between them.
- Second rise: Cover rolls loosely and let rise for 30 minutes until puffy. Preheat oven to 375°F (190°C) during the last 15 minutes.
- Bake: Brush tops lightly with water or oil. Bake for 15-18 minutes until golden brown and hollow when tapped.
- Cool: Remove from oven and cool on a wire rack for at least 15 minutes before slicing.
Notes
Ensure water temperature is between 105°F and 115°F to activate yeast without killing it. Do not skip kneading to ensure soft texture. If rolls brown too fast, tent with foil. Store in airtight container at room temperature for up to 3 days or freeze for up to 3 months.
- Prep Time: 30 minutes
- Cook Time: 15-18 minutes
- Category: Side Dish
- Cuisine: American
Nutrition
- Serving Size: 1 roll
- Calories: 150
- Sugar: 2
- Sodium: 300
- Fat: 2
- Carbohydrates: 28
- Fiber: 1
- Protein: 4
Keywords: hoagie rolls, homemade bread, budget recipes, soft rolls, sandwich buns, yeast dough, meal prep